Server Unavailable Try Again Later Email App
This browser is no longer supported.
Upgrade to Microsoft Edge to accept reward of the latest features, security updates, and technical support.
Restore files to Windows Server using the MARS Agent
This article explains how to restore data from a backup vault. To restore information, you lot use the Recover Data sorcerer in the Microsoft Azure Recovery Services (MARS) Agent. Yous can:
- Restore data to the same machine from which the backups were taken.
- Restore information to an alternating machine.
Use the Instant Restore feature to mount a writeable recovery point snapshot as a recovery volume. You can then explore the recovery volume and re-create files to a local computer, in that way selectively restoring files.
Use Instant Restore with Recovery Services vaults in the Azure portal. If you lot stored data in Backup vaults, they've been converted to Recovery Services vaults. If yous want to use Instant Restore, download the MARS update, and follow the procedures that mention Instant Restore.
Note
Azure has two unlike deployment models yous can use to create and work with resources: Azure Resources Director and classic. This article covers the use of the Resource Manager deployment model. We recommend the Resource Manager deployment model for new deployments instead of the classic deployment model.
Apply Instant Restore to recover data to the aforementioned machine
If you accidentally deleted a file and want to restore it to the same auto (from which the fill-in is taken), the post-obit steps will aid you recover the information.
-
Open the Microsoft Azure Backup snap-in. If you don't know where the snap-in was installed, search the calculator or server for Microsoft Azure Backup.
The desktop app should appear in the search results.
-
Select Recover Data to start the magician.
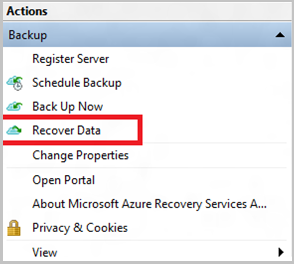
-
On the Getting Started page, to restore the data to the same server or computer, select This server (
<server name>) > Side by side.
-
On the Select Recovery Style page, cull Individual files and folders > Adjacent.

Important
The selection to restore individual files and folders requires .Cyberspace Framework four.5.2 or later. If you don't see the Private files and folders option, you must upgrade .NET Framework to version iv.v.2 or later on, and try over again.
Tip
The Individual files and folders pick allows for quick access to the recovery point data. It's suitable for recovering individual files, and is recommended for a total size of less than 80 GB. It offers transfer or copy speeds upwardly to half-dozen MBps during recovery. The Volume choice recovers all backed up data in a specified book. This selection provides faster transfer speeds (up to twoscore MBps), and is recommended for recovering large-sized data or entire volumes.
-
On the Select Volume and Date page, select the volume that contains the files and folders yous want to restore.
On the calendar, select a recovery point. Dates in bold indicate the availability of at to the lowest degree one recovery indicate. If multiple recovery points are available within a unmarried date, cull the specific recovery point from the Time drop-down carte du jour.
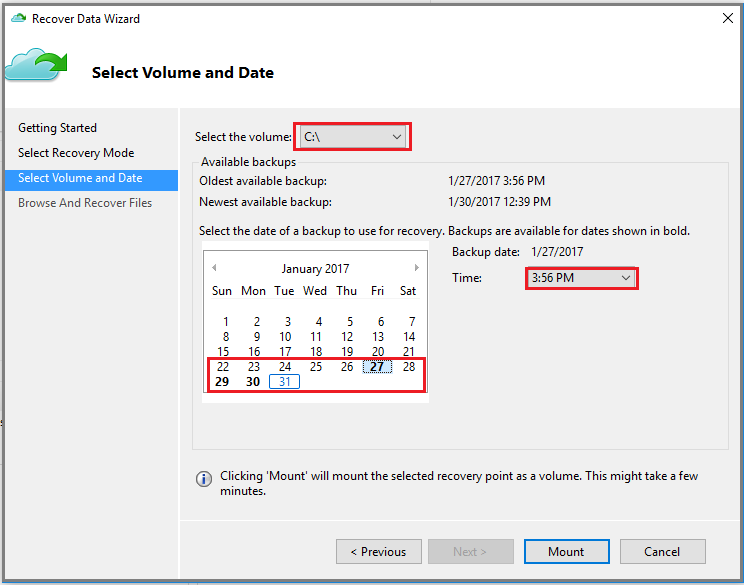
-
After choosing the recovery point to restore, select Mount.
Azure Backup mounts the local recovery signal, and uses it as a recovery book.
-
On the Browse and Recover Files page, select Browse to open Windows Explorer, and find the files and folders you want.

-
In Windows Explorer, copy the files and folders you want to restore, and paste them to whatsoever location local to the server or computer. Yous can open or stream the files direct from the recovery volume, and verify that you're recovering the correct versions.

-
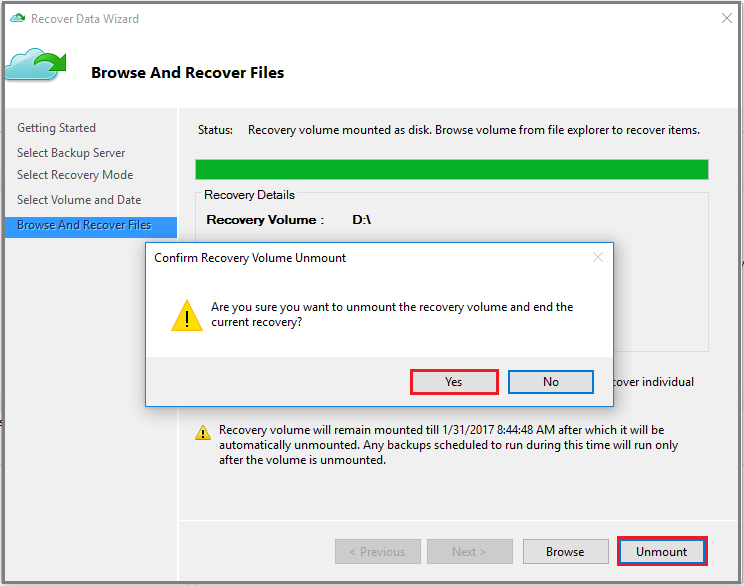
When you're finished, on the Browse and Recover Files folio, select Unmount. So select Yes to confirm that you desire to unmount the volume.

Of import
If y'all don't select Unmount, the recovery volume will remain mounted for six hours from the fourth dimension when it was mounted. However, the mount time is extended to a maximum of seven days in case of an ongoing file-copy. No backup operations volition run while the volume is mounted. Any backup functioning scheduled to run during the time when the volume is mounted will run after the recovery book is unmounted.
Employ Instant Restore to restore information to an alternating machine
If your entire server is lost, yous can still recover data from Azure Backup to a different machine. The following steps illustrate the workflow.
These steps include the following terminology:
- Source car – The original auto from which the backup was taken, and which is currently unavailable.
- Target machine – The machine to which the data is being recovered.
- Sample vault – The Recovery Services vault to which the source machine and target machine are registered.
Annotation
Backups tin't be restored to a target machine that's running an earlier version of the operating organisation. For example, a fill-in taken from a Windows seven estimator tin can be restored on a Windows 7 (or afterwards) computer. A fill-in taken from a Windows 10 calculator tin't be restored to a Windows 7 computer.
-
Open the Microsoft Azure Backup snap-in on the target machine.
-
Ensure that the target auto and the source machine are registered to the same Recovery Services vault.
-
Select Recover Data to open the Recover Data Magician.
-
On the Getting Started page, select Another server.

-
Provide the vault credential file that corresponds to the sample vault, and select Side by side.
If the vault credential file is invalid (or expired), download a new vault credential file from the sample vault in the Azure portal. After y'all provide a valid vault credential, the proper name of the respective fill-in vault appears.
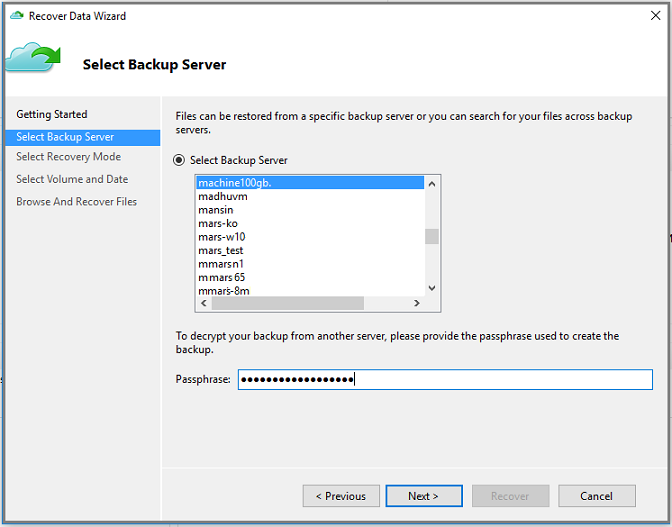
-
On the Select Backup Server page, select the source machine from the list of displayed machines, and provide the passphrase. And then select Next.
-
On the Select Recovery Style folio, select Individual files and folders > Next.

-
On the Select Volume and Date page, select the volume that contains the files and folders you want to restore.
On the agenda, select a recovery betoken. Dates in bold indicate the availability of at to the lowest degree one recovery signal. If multiple recovery points are available within a single date, choose the specific recovery point from the Fourth dimension drop-down bill of fare.

-
Select Mount to locally mount the recovery point as a recovery volume on your target auto.
-
On the Browse And Recover Files page, select Browse to open up Windows Explorer, and notice the files and folders y'all want.
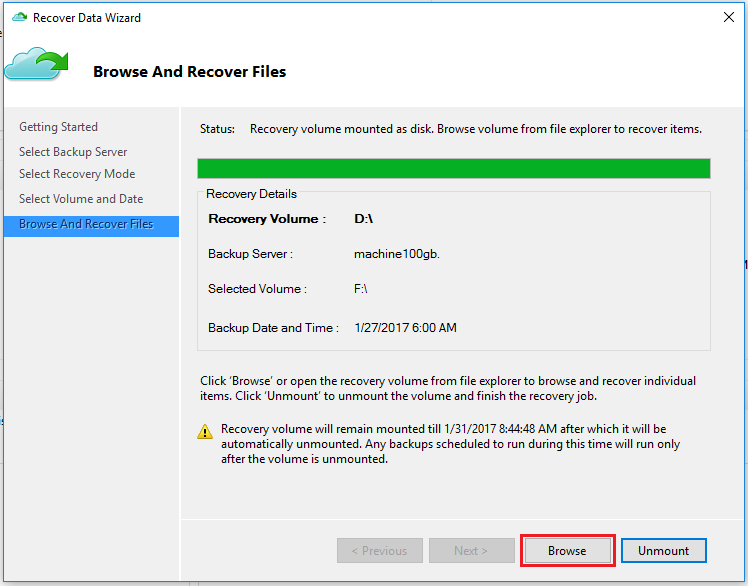
-
In Windows Explorer, re-create the files and folders from the recovery volume, and paste them to your target car location. Yous can open or stream the files straight from the recovery volume, and verify that the correct versions are recovered.

-
When you're finished, on the Browse and Recover Files folio, select Unmount. And then select Yep to confirm that yous want to unmount the volume.
Important
If you don't select Unmount, the recovery book will remain mounted for vi hours from the time when it was mounted. However, the mountain time is extended up to a maximum of 24 hours in the case of an ongoing file-copy. No backup operations volition run while the volume is mounted. Any backup operation scheduled to run during the time when the volume is mounted volition run later the recovery book is unmounted.
Adjacent steps
-
Now that you've recovered your files and folders, you can manage your backups.
-
Find Common questions nearly bankroll upwards files and folders.
Feedback
Submit and view feedback for
Source: https://docs.microsoft.com/en-us/azure/backup/backup-azure-restore-windows-server
0 Response to "Server Unavailable Try Again Later Email App"
Post a Comment